Happy New Year Everyone!
We have new challenge over at Pattie's Creations and the theme is SNOWY DAYS/NIGHTS
I chose to make a snowy night scene on my creation.
I decided to make a new Tissue Box Cover for the Winter and chose my image called "Snow Birds Birdhouse". You can purchase it by clicking on the name and it will take you to my Etsy Store.
I colored my image using Photoshop and added some Stickles Glitter to the snow. I used chipboard for the tissue box cover and added plaid paper that I made in Photoshop.
If you would like to make a tissue box cover just follow my tutorial below.
TISSUE BOX COVER
By Pattie Gomez
DIMENSIONS
BASE SIDES:
CUT 2 5 1/8” by 9 1/2” PIECES OF HEAVY CARDSTOCK
SCORE EACH PIECE AT ½” & 5”
LID:
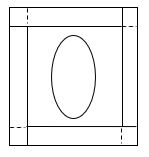
CUT 1 6 9/16”
SQUARE
SCORE AT 1” ON ALL SIDES
CUT ON DASHED LINES AND FOLD TO MAKE A LID
CUT OUT AN OVAL IN THE CENTER OF LID
CUT 4 PIECES OF COLORED CARDSTOCK (ANY COLORS YOU LIKE) 4
1/4” X 4”
CUT 1 PIECE OF COLORED CARDSTOCK FOR LID 4 ¼” SQUARE
CUT 4 PIECES OF COLORED CARDSTOCK FOR SIDES OF LID 4 ¼” X
¾” (or use ribbon)
GLUE THE 2 BASE SIDE PIECES TOGETHER AND THEN GLUE A
PIECE OF COLORED CARDSTOCK TO EACH SIDE.
FOR THE TOP OF THE LID CUT OUT ANOTHER OVAL OR ANY SHAPE
THAT YOU LIKE. MAKE IT A LITTLE SMALLER THAN THE CUTOUT ON THE LID. GLUE THE
REST OF THE PIECES TO THE BASE (LID AND LID SIDES)
You can add another layer of patterned or colored paper
on top of the first layer if you like. Add a digital image to the front of the
tissue box cover or be creative and try whatever you like. Add some ribbon to
the lid if you like.


